Learning to circulate can be overwhelming and intimidating for new nurses. They may learn two or three different ways to set up a room, on two or three different days, from two or three different preceptors.
Having a consistent, systematic way to set up an OR can help relieve the confusion and anxiety a new nurse may experience. Dividing a room into circulating “Zones” is one way to standardize OR setup.

Joseph Brown, RN, CNOR
The Zone technique, also known as TORCZ (The Operating Room Circulating Zones), was developed by Joseph Brown, RN, CNOR, OR preceptor at the University of Texas MD Anderson Cancer Center, Houston. It is a step-by-step process that divides an OR into six distinct Zones (photo, p 25).
Key to the technique is that new nurses focus on one Zone at a time, and they finish one Zone before transitioning to the next. “This creates a flow that increases the new nurse’s comfort level,” Brown told OR Manager.
“I used to let the new nurses set the rooms up the way they wanted, but one day I noticed a nurse going from one end of the room to the other, totally disorganized and flustered, and I decided there had to be a better way,” he says.
Zone 1 is the space the OR bed occupies—from floor to ceiling, which also includes the overhead lights.
The steps to be completed in Zone 1 include, but are not limited to:
• Bed is in proper position and locked.
• Overhead lights are positioned and tested.
• Bed safety straps are on and functional.
• Positioning devices are on the bed, depending on the case (eg, beanbag, foam/gel rolls and donuts).
• Sequential compression device (SCD) sleeves and forced-air warming blanket are at the foot of the bed.
• One arm board is on the bed opposite the entry door, and the second arm board is near the entry door for placement after patient transfer (both boards are padded and covered).
• Adequate space is available for anesthesia personnel, lines, and equipment.
“The first thing I tell new nurses to do is nudge the bed to make sure it is locked in place,” says Brown. “You don’t want to discover the bed is unlocked when you go to move the patient,” he says.
Next, they should make sure the overhead lights are in position and tested for functionality. “A lot of times nurses set up their rooms and forget the lights,” says Brown. “The lights should always be taken care of before the patient comes into the room.”
The nurses can then put the bed in the proper position for the case (eg, supine, lithotomy), ensure the bed straps are on and functional, place positioning devices on the bed, and tuck items such as SCD sleeves and forced-air warming blankets under the mattress at the foot of the bed.
“I tell the nurses to put these items in the same place every time. Having a routine will make them feel comfortable,” says Brown.
As part of Zone 1 steps, nurses should make sure anesthesia personnel have adequate space. “Many times we position the bed and equipment in a way that takes away from the space needed by the anesthesiologists and CRNAs [certified registered nurse anesthetists] for their equipment and supplies,” says Brown.
After completing Zone 1, the nurse moves to Zone 2, which is a working zone that contains surgical equipment. This Zone is at the upper left of the room, and among the steps are:
• Suction is hooked up, and appropriate sized containers are in place and functioning, with extension tubing attached.
• Surgical headlight is plugged in and functioning.
• Electrosurgical machine is plugged in and set at the correct settings.
• Smoke evacuation, forced-air warming, and other machines that may be needed are hooked up and functioning.
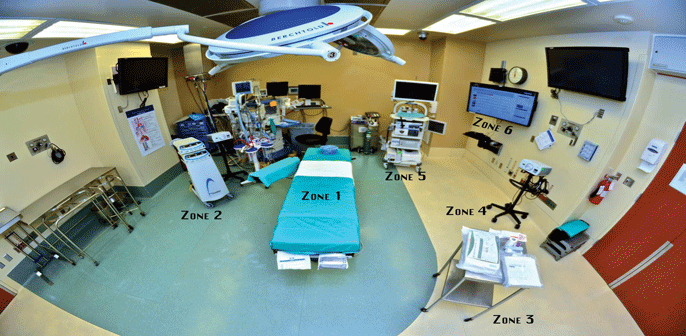
For the Zone technique, an OR is divided into six circulating Zones for room setup at the University of Texas MD Anderson Cancer Center, Houston. Used with permission.
The nurse then transitions to Zone 3, which includes any supplies the circulating nurse uses to care for the patient.
• On a prep table, the nurse will have items such as a prep kit, clippers/razors, tape, urinary catheter kit, and electrosurgical dispersive electrode pad.
• The nurse might also have a second table for case-specific items such as laryngoscopes, cords, forceps, suction tips, gloves, and specimen cups for an examination under anesthesia.
When Zone 3 is completed, the nurse moves to Zone 4, which is another working zone on the opposite side of the room from Zone 2. Zone 4 mirrors Zone 2 in that all of the equipment in Zone 2 could be in Zone 4 instead, depending on the case and the preferences of the surgeon.
Once Zone 4 is done, the nurse goes to Zone 5, which is a viewing zone at the upper right side of the room. It contains all audio-visual equipment, such as bronchoscopy, cystoscopy, and laparoscopy towers.
Finally, the nurse transitions to Zone 6, which is an optional viewing zone for those with a central computer where the OR record, patient history, x-rays, and other images and records can be accessed and viewed.
“The pros of this setup are that everyone can see the patient information and films,” says Brown, “but the con is that once the circulating nurse logs on, another member of the team can use that login to pull up another patient’s information.”
This Zone might work well at a smaller hospital, but in a large teaching hospital, there could be privacy concerns, he says.
The take-away point of the Zone technique, says Brown, is that it’s a systematic, focused, and standard process for setting up an OR. “By completing one Zone before moving to the next, the time-consuming ‘busy-bee’ effect of going from place to place in a disorganized manner is eliminated.”
The technique gives new nurses a feeling of confidence because they have a consistent way to set up a room that can be used in any room for any case, he says.
Circulating nurses also can customize the Zones for their own needs, for example, the placement of the SCD machine and sleeves. “As long as they do it the same way every time, that’s fine,” says Brown.
After using the Zones for a couple of weeks, new nurses can walk into a room, look around, and know immediately if something is missing. “They no longer have to ask: ‘What did I forget?’” Brown says. ✥
Brown J. Implementing operating room circulating Zones to enhance safe and effective practice. Poster session. AORN Surgical Conference & Expo 2015.